

Installing a toilet is pretty much the same process whether you’re replacing an old toilet or completing a new bathroom.
A one-piece toilet is installed in the same way as a two-piece unit except that it’s more cumbersome to handle. Because it’s all in one piece, however, the installation goes faster, because you don’t need to install pieces separately.Carefully read the installation instructions packaged with the toilet and identify the parts and then follow these steps to install a new toilet:
Step 1
Check the contents of the package to make sure there are no damaged parts. Before starting assembly, make sure you have the necessary tools and enough space. Please turn off the water supply before installation.
Before installation, please ensure that the installation surface is clean, dry, and flat.
Step 2
Position the cabinet bolts and rotate the T-shaped head of each bolt so that it snaps into the slot of the flange. Push the latch into the socket and slide it parallel to the wall behind the toilet. Turn the bolt so that the machine head cannot be pulled out from the flange. Slide the plastic retaining washers along the threads to hold the bolt in place.
Step 3
Locate the toilet drain outlet, which is the hole in the center of the toilet base. Place the wax ring and its sleeve over the toilet horn and press firmly down. This wax ring fits around the toilet horn and when you press it into the floor it puts pressure on the drain flange which then bolts it in place. The plastic nozzle must point upward. You can use a wax ring once, because the wax ring will not bounce back after being compressed. The key to proper sealing is to rest the toilet on the flange without disturbing it.Step 4:
Carefully lower the toilet bowl onto the flange, aligning the holes in the toilet bowl. When you lower the toilet to the floor, have another person help you line up the bolts with the holes in the toilet bowl. Keep the bowl level as you lower it to the floor.
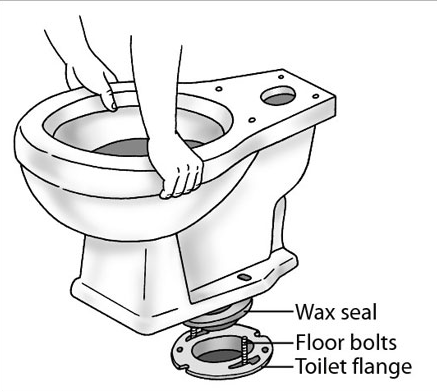
Gently but firmly press the base against the wax ring
Step 5
Place a carpenter’s level on the toilet base to make sure the toilet is level, then place washers and nuts on the bolts and tighten them with an adjustable wrench.
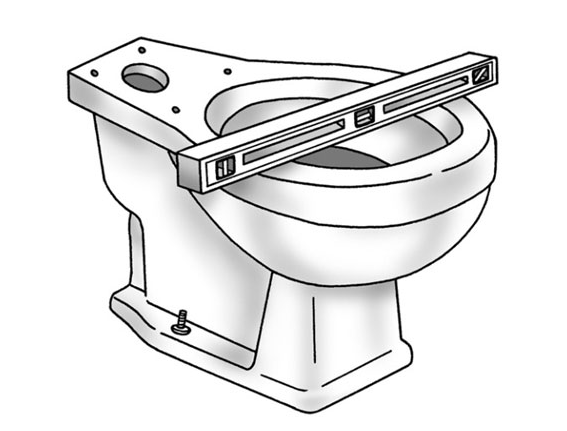
Make sure the toilet is level
Step 6
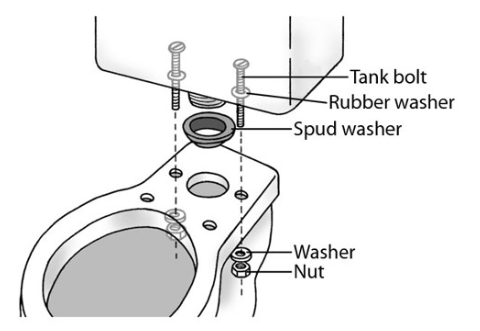
Install flushing mechanism. Turn the tank upside down and attach the rubber seal, also known as a spring washer, to the tube sticking out of the bottom of the tank. Carefully turn the tank right side up and center the dishwasher over the water outlet, which is located at the back edge of the bowl at the base of the toilet.Lower the tank to the back of the bowl, align the tank bolts and rubber washers with the holes in the tank, and insert the tank mounting bolts through the holes in the bowl.At the base of the toilet, thread the washer and nut, tightening first by hand and then with a large wrench.
Tightening them
Step 7
To connect the standpipe (water supply pipe) pipe and the stop valve, first tighten the connecting nut on the tank connection piece by hand, and then use a wrench to tighten the compression connection piece on the stop valve.
Reinforced flexible pipe in various lengths in white or braided stainless steel is highly reliable and easier to install than standard plastic or chrome-plated brass pipe.
Step 8
Commissioning and acceptance: Check whether there is water seepage or leakage around the product and at the joints of accessories; whether the water inlet is normal and flushing is smooth; whether the toilet body is stable (no shaking).
Cleaning: Thoroughly clean the installation area using an appropriate cleaner.